"

Chapter 8: Angular Kinetics

8.1 Static Equilibrium Revisited

Authors: Paul Peter Urone, Roger Hinrichs
Adapted by: Rob Pryce, Alix Blacklin

Learning Objectives

By the end of this section, you will be able to:

  • State the first condition of equilibrium.
  • Explain static equilibrium.
  • Explain dynamic equilibrium.


The first condition necessary to achieve equilibrium is the one already mentioned: the net external force on the system must be zero. Expressed as an equation, this is simply

[latex]\text{net}\phantom{\rule{0.25em}{0ex}}\mathbf{F}=0[/latex]

Note that if net [latex]\mathbf{F}[/latex] is zero, then the net external force in any direction is zero. For example, the net external forces along the typical x– and y-axes are zero. This is written as

[latex]\text{net}\phantom{\rule{0.25em}{0ex}}{F}_{x}=0\phantom{\rule{0.25em}{0ex}}\phantom{\rule{0.25em}{0ex}}\text{and net}\phantom{\rule{0.25em}{0ex}}{F}_{y}=0[/latex]

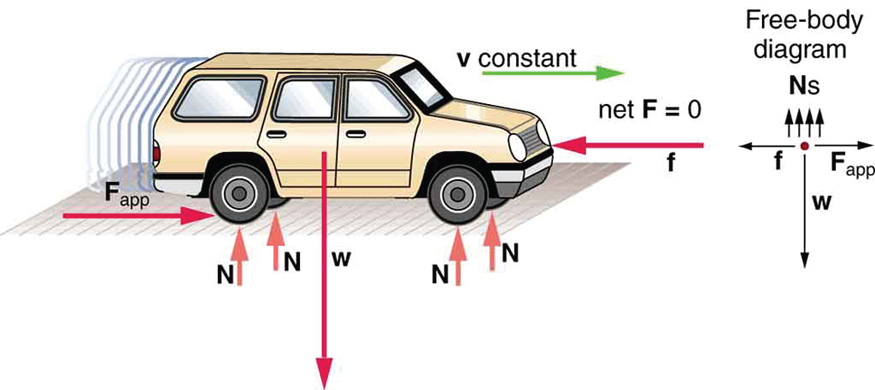
The two figures below illustrate situations where [latex]\text{net}\phantom{\rule{0.25em}{0ex}}\mathbf{F}=0[/latex] for both static equilibrium (motionless), and dynamic equilibrium (constant velocity).
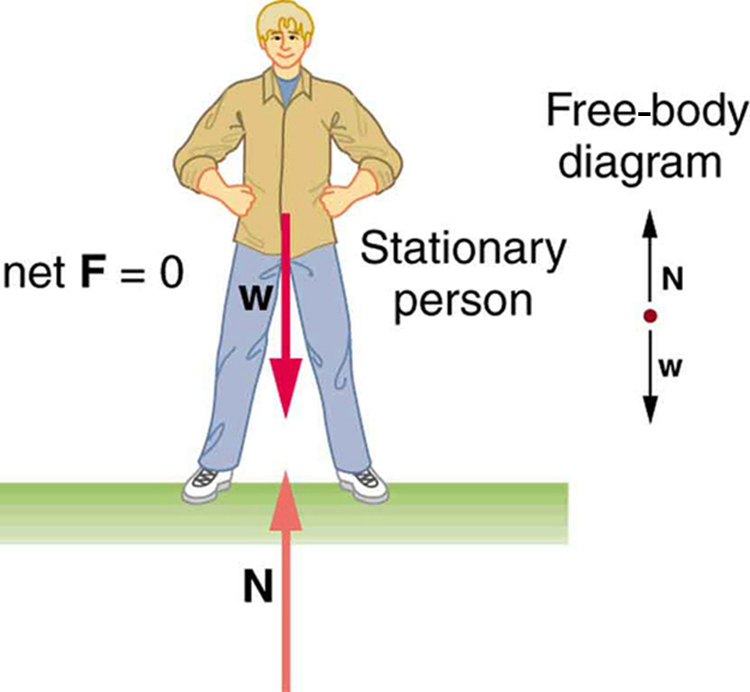
In the figure, a stationary man is standing on the ground. His feet are at a distance apart. His hands are at his waist. The left side is labeled as net F is equal to zero. At the right side a free body diagram is shown with one point and two arrows, one vertically upward labeled as N and another vertically downward labeled as W, from the point.
Figure 8.2 This motionless person is in static equilibrium. The forces acting on him add up to zero. Both forces are vertical in this case.


A moving car is shown. Four normal vectors at each wheel are shown. At the rear wheel, a rightward arrow labeled as applied F is shown. Another arrow, which is labeled as f and points left, toward the front of the car, is also shown. A green vector at the top of the car shows the constant velocity vector. A free-body diagram is shown at the right with a point. From the point, the weight of the car is downward. Friction force vector f is toward left and applied force vector is toward right. Four normal vectors are shown upward above the point.
Figure 8.3 This car is in dynamic equilibrium because it is moving at constant velocity. There are horizontal and vertical forces, but the net external force in any direction is zero. The applied force [latex]{\mathbf{F}}_{\text{app}}[/latex] between the tires and the road is balanced by air friction, and the weight of the car is supported by the normal forces, here shown to be equal for all four tires.

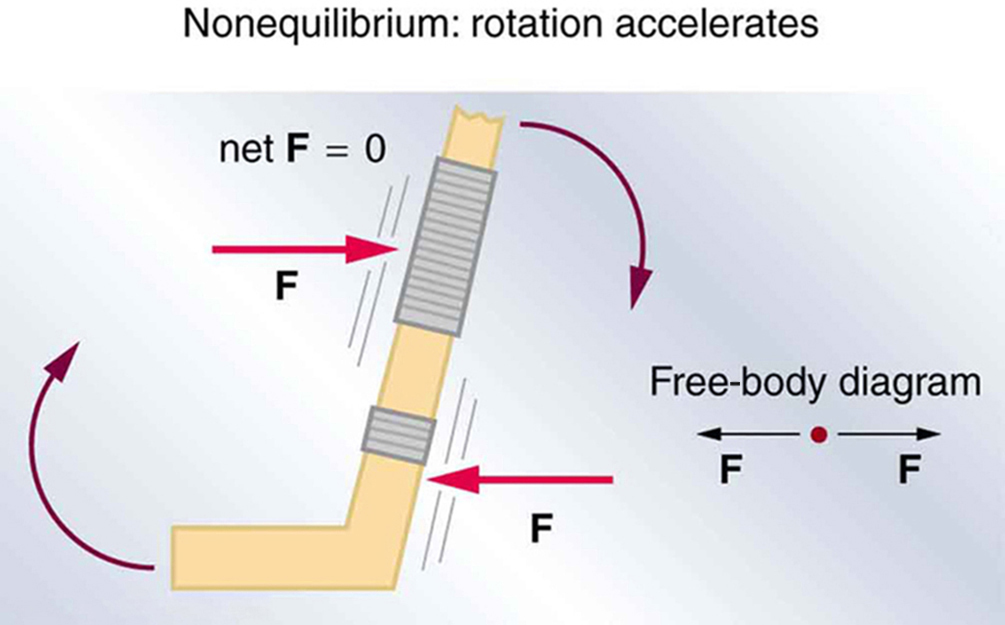
However, it is not sufficient for the net external force of a system to be zero for a system to be in equilibrium. Consider the two situations illustrated in the two figures below, where forces are applied to an ice hockey stick lying flat on ice. The net external force is zero in both situations shown in the figure; but in one case, equilibrium is achieved, whereas in the other, it is not. In the first figure, the ice hockey stick remains motionless. But in the second, with the same forces applied in different places, the stick experiences accelerated rotation. Therefore, we know that the point at which a force is applied is another factor in determining whether or not equilibrium is achieved. This will be explored further in the next section.
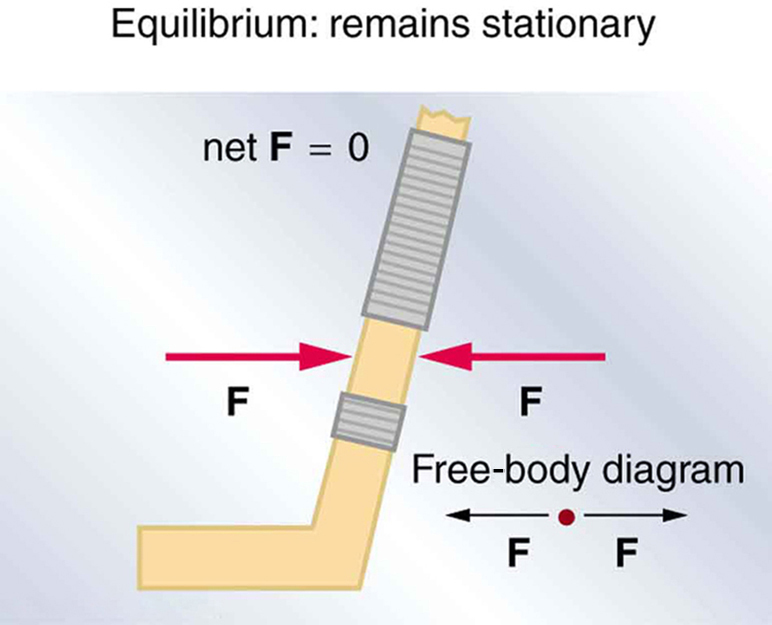
A hockey stick is shown. At the middle point of the stick, two red colored force vectors are shown one pointing to the right and the other to the left. The line of action of the two forces is the same. The top of the figure is labeled as net force F is equal to zero. At the lower right side the free body diagram, a point with two horizontal vectors, each labeled F and directed away from the point, is shown.
Figure 8.4 An ice hockey stick lying flat on ice with two equal and opposite horizontal forces applied to it. Friction is negligible, and the gravitational force is balanced by the support of the ice (a normal force). Thus, [latex]\text{net}\phantom{\rule{0.25em}{0ex}}\mathbf{F}=0[/latex]. Equilibrium is achieved, which is static equilibrium in this case.
A hockey stick is shown. The two force vectors acting on the hockey stick are shown, one pointing to the right and the other to the left. The lines of action of the two forces are different. Each vector is labeled as F. At the top and the bottom of the stick there are two circular arrows, showing the clockwise direction of the rotation. At the lower right side the free body diagram, a point with two horizontal vectors, each labeled F and directed away from the point, is shown.
Figure 8.4 The same forces are applied at other points and the stick rotates—in fact, it experiences an accelerated rotation. Here [latex]\text{net}\phantom{\rule{0.25em}{0ex}}\mathbf{F}=0[/latex] but the system is not at equilibrium. Hence, the [latex]\text{net}\phantom{\rule{0.25em}{0ex}}\mathbf{F}=0[/latex] is a necessary—but not sufficient—condition for achieving equilibrium.

PhET Explorations: Torque

Investigate how torque causes an object to rotate. Discover the relationships between angular acceleration, moment of inertia, angular momentum and torque. Click to open media in new browser.


License

Icon for the Creative Commons Attribution 4.0 International License

Introduction to Biomechanics Copyright © 2022 by Rob Pryce is licensed under a Creative Commons Attribution 4.0 International License, except where otherwise noted.