Lab 1: What Are Minerals?
Physical Properties of Minerals
Learning Objectives
The goals of this Laboratory Session are to:
- Describe what defines a mineral and why we classify them
- Identify key physical properties and demonstrate how to test for them correctly
1.1 Introduction to Minerals
Geologists must make sense of the Earth’s numerous naturally forming materials. Because there are thousands of these materials, a detailed description and classification scheme are important. After all, these Earth materials are where most of the elements used in the manufacturing of everyday items come from.
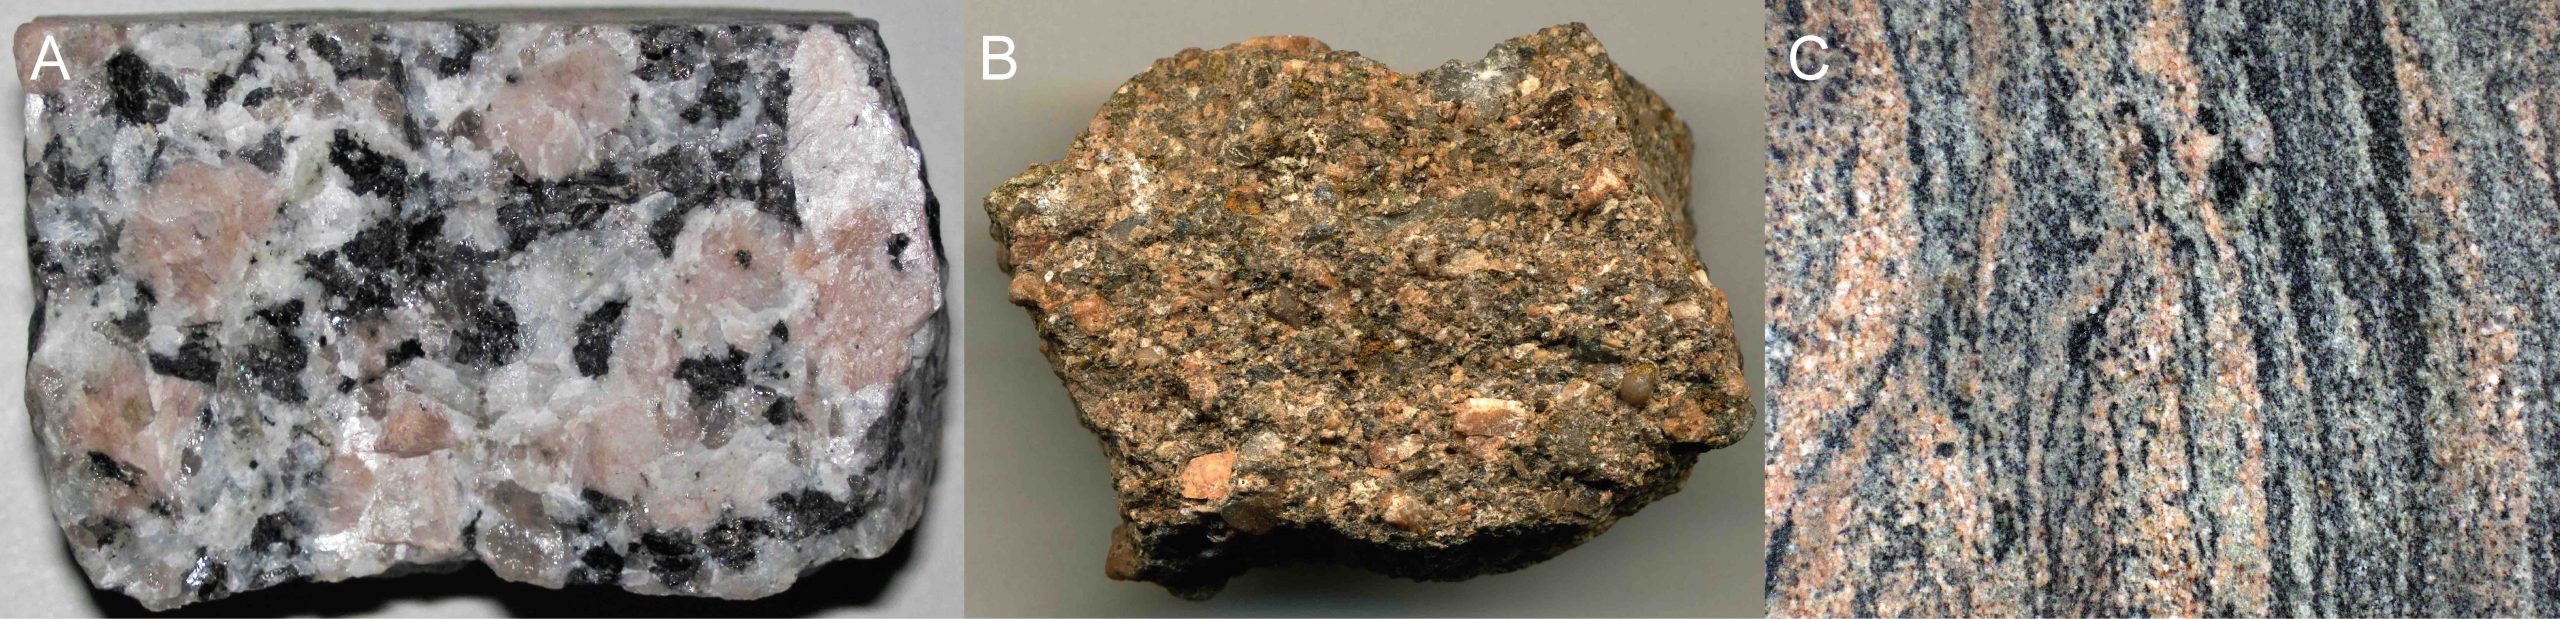
An important distinction to make in Earth materials is the difference between a mineral and a rock. Minerals are the basic building blocks of rocks, which means rocks are made up of different combinations of minerals or just one mineral in some cases. A mineral is a naturally occurring, usually inorganic, solid that can be defined by a chemical formula and a crystal structure. Figure 1.1a is an example of a rock called granite, which is made up of a combination of minerals. Figures 1.1b and 1.1c are two other types of rocks, sandstone and gneiss. They contain the same minerals as the granite in Figure 1.1a. Even though they contain the same minerals, all three of these rocks formed in different ways. We’ll get to that a little later, so for now, let’s focus on minerals.
1.2 Physical Properties of Minerals
An essential skill for a geoscientist is to be familiar with mineral names and compositions and be able to recognize them in rocks, but there are over 5,000 known minerals, which makes for an impossible task. Luckily, for most Physical Geology classes, there are only about twenty or so minerals you’ll need to be familiar with. The way that you can tell them apart is by their physical properties, which can be observed or tested using common items:
- Colour
- Lustre
- Streak
- Hardness
- Cleavage and fracture
- Other properties
We will go through these systematically so that you can become skilled at these techniques. Some of the minerals you will work on in this lab are found in many rock types, and others are only found in special settings such as ore deposits.
One more thing: Often, you can find identifying features simply by looking at the mineral. Sometimes, you need to look closer at the mineral using a hand lens (a type of magnifying glass). The correct way to use a hand lens is to hold it up to your eye and move the rock or mineral in or out until it comes into focus (Figure 1.2).

Colour
Colour is an eye-catching property of minerals, but it is rarely diagnostic. Consider it in your mineral identification, but do not rely on it as the major identifying characteristic. Colour may change based on the elements in the mineral’s structure, or if there are impurities, flaws, or damage. For example, quartz can occur in many different colours, as you will see in your sample drawers. Some minerals may be described as “colourless”; avoid using words such as “clear”, which may imply transparency, which is a different physical property.
Exercise 1.1 – Mineral Colour
Even though colour is not very diagnostic for most minerals, it’s still an important component in narrowing down your mineral identification when combined with other physical properties.
- Your instructor has provided you with a selection of minerals. What are the colours of the following samples? Try to be as specific as possible (e.g., “reddish brown” instead of “brown”).
Table 1.1 – Mineral Colour Sample # Colour 17 18 19 20 - What is the most common colour in your assigned minerals?
- What is the least common colour in your assigned minerals?
- Do you think any of your minerals have a unique colour that can be used as a diagnostic property? Explain.
- For your minerals that do not have a unique colour, is there anything else you can observe to help you differentiate between them? Explain.
Lustre
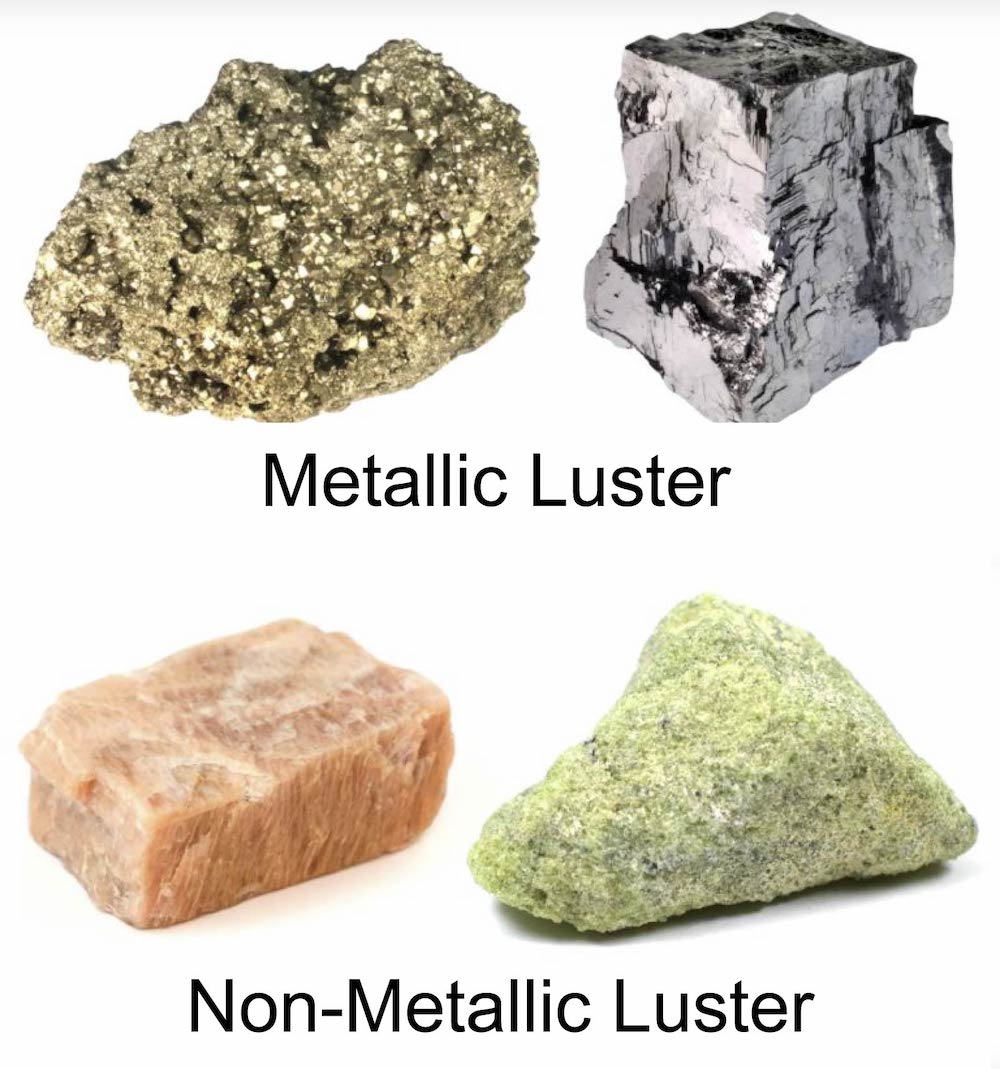
Lustre (or luster) describes how the surface of a mineral reflects light, or its “sheen”. We use descriptive words to describe lustre, such as metallic and non-metallic, the two basic types of lustre (Figure 1.3). A sample with a metallic lustre will look like it is a polished metal; one with a non-metallic lustre does not. Some minerals have a submetallic lustre, still somewhat metal-like, but duller than those with a metallic lustre. Non-metallic lustres are described in more detail; the common non-metallic lustres include glassy (or vitreous), pearly, resinous, silky, greasy, waxy, dull, and earthy. Although you will not have one in your sample set, some minerals have an adamantine lustre: brilliant, like diamond. Be careful to observe lustre on clean, fresh surfaces, as sometimes their lustre can change with exposure to weathering.
Exercise 1.2 – Mineral Lustre
Your instructor has provided you with a selection of minerals.
- What is the lustre of the following samples? For non-metallic lustres, you must provide a more specific name for the lustre.
Table 1.2 – Mineral Lustre Sample # Lustre 17-20 15 27 12 8 - Did you notice any other differences between your metallic and non-metallic minerals?
Streak
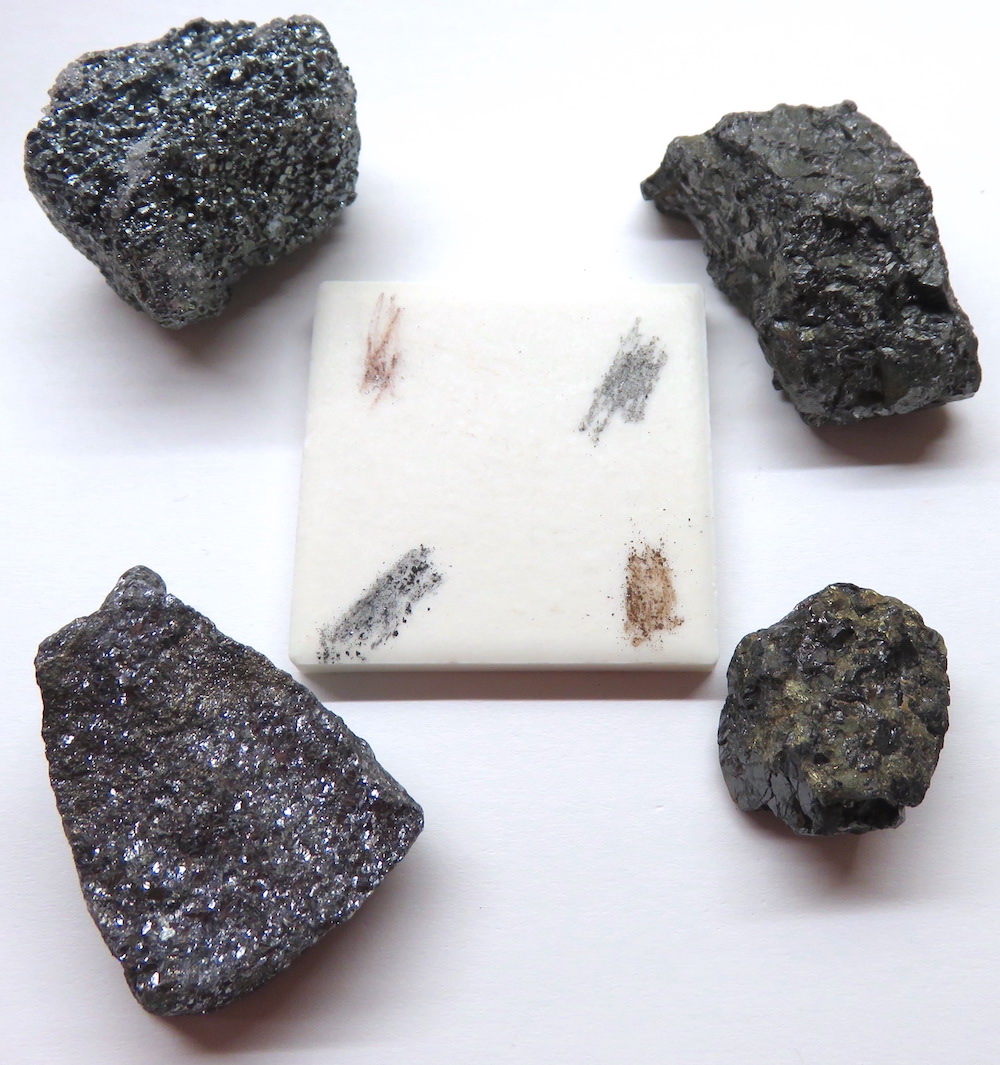
Streak is the colour of a mineral’s powder. Streak can be determined easily by scratching a mineral across an unglazed porcelain plate called a streak plate (Figure 1.4). This is more diagnostic than a mineral’s surface colour, as some minerals have a different coloured streak than their surface colour.
To test streak:
- Place the streak plate flat on the table and hold it steady.
- Drag the mineral firmly across the plate, in one line.
- If a powder is produced, observe the colour.
NOTE: Some minerals will have a white streak, which is difficult to identify on the white streak plate. Certain minerals will not create a streak because the mineral is harder than the streak plate (we will revisit this later in this lab). If you are uncertain whether the mineral left a streak on the plate, wipe your finger across the plate and look at your finger.
The colour of a mineral’s streak is often compared to that of the mineral. Figure 1.4 shows how some minerals have the same colour streak as the mineral. Notice that two of these have a different streak than that of the mineral.
Exercise 1.3 – Mineral Streak
Your instructor has provided you with a selection of minerals.
- What is the streak of the following specimens? (Note: Be as descriptive as possible with the colours you name. For example, don’t say just “brown”; be more specific, for example, “reddish brown”.)
Table 1.3 – Streak Colour Sample # Streak Colour 4 5 11 12 13 14 15 16 - Do you notice anything common between minerals whose streak colour differs from the hand sample colour? Explain.
- Why can’t you get a streak with a streak plate for samples #18 and #26? How could you determine these (or any) minerals’ streak without a streak plate? Would this be advisable in a lab setting? Why or why not?
- Critical Thinking: Do you think it would be useful to carry a streak plate with you when going to look at minerals in the field? Why or why not?
Hardness
Hardness is the measure of a mineral’s resistance to scratching. The Mohs Hardness Scale ranks the relative hardness of minerals from 1 (corresponding to the softest mineral, talc) to 10 (corresponding to the hardest mineral, diamond) (Figure 1.5). The numbers do not have units of measure. Hardness is an important and reliable diagnostic physical property of a mineral. However, hardness can vary slightly because of composition, and it is one of the most difficult to determine in a rock because rocks generally have small mineral grains.
A mineral’s hardness is determined by a scratch test using materials of known hardness, as harder substances will be able to scratch softer ones. Common materials such as fingernails, copper coins such as pennies, glass, steel nails, and porcelain plates are used to conduct scratch tests, and all vary in hardness. To conduct a scratch test:
- Try to find a corner of the mineral that has not been too scratched up.
- Scratch the mineral. It is best to start with a utensil that is lower on the hardness scale and “work your way up” the scale by using harder utensils. If the mineral seems similar to the thing you’re using to scratch, scratch it really hard. When using the glass, try scratching the glass with the mineral; don’t try to scratch the mineral with the glass.
- When you scratch a mineral, sometimes it’s hard to tell if the powder is coming from the mineral (if you scratched the mineral) or if it’s coming from the thing you used to scratch it (the mineral is harder than the utensil). In this case, wipe the surface of the mineral with your finger to see if there is an actual mark left. If there is a mark, the utensil scratched the mineral.

Exercise 1.4 – Mineral Hardness
Your instructor has provided you with a selection of minerals.
- Fill in the Mohs hardness numbers that correspond to the tests given below for hardness. List the samples in your set according to the hardness criteria in Table 1.4.
Table 1.4 – Mineral Hardness Hardness Mohs Hardness Sample #s Softer than a fingernail harder than a fingernail, softer than a penny harder than a penny, softer than a nail harder than a nail - Hardness determinations on sample #9 are difficult, and in lab situations such as these are usually inaccurate. Why?
Cleavage and Fracture
A mineral’s crystal lattice controls how a mineral breaks. The two types of breakage are cleavage and fracture. If a mineral breaks along preferred planes, it has cleavage. Where minerals do not break along preferred planes, they have fracture. These are important diagnostic physical properties.
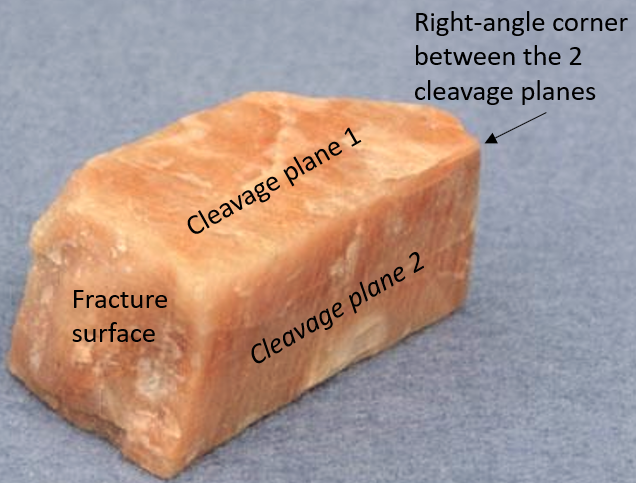
Cleavage describes how minerals break predictably. Minerals may preferentially break along planes of weak chemical bonds, producing flat surfaces called cleavage planes, which repeat in parallel. Perfect cleavage, like mica minerals with one plane of cleavage, can be easily recognized because these surfaces reflect light like mirrors. Cleavage planes commonly occur as small step-like segments, which all reflect light at the same time when the mineral is rotated.
Cleavage planes and crystal faces are not the same thing, even though both are planes. Cleavage planes repeat through the sample, whereas crystal faces bound the crystal. Samples with well-developed crystals should be examined on broken surfaces to see if there are small cleavage planes that are parallel to the crystal face.

Fracture describes irregular breakage, or irregular fracture, which usually occurs on planes that do not have weak bonds, therefore does not have a regular pattern. Some minerals will exhibit a conchoidal fracture, where the fracture is curved and resembles fractures sometimes seen in broken glass. While not many mineral species have conchoidal fracture, this type of fracture is easily identified and can be helpful in identification if present.
Cleavage identification takes significant practice and patience and is a very important technique to learn. In theory, we could break apart minerals to see what planes they break along; however, this is too destructive to help us. Instead, use a hand lens to examine your sample, unless the cleavage is obvious. The correct way to use a hand lens is to hold it up to your eye and move the rock or mineral in or out until it comes into focus. Look for repeating parallel steps or lines; these define cleavage planes. The steps should shine in the light as the sample is turned. Once one plane is identified, check for another set of regularly repeating steps that are at an angle from the first plane you identified. If there is a second plane, determine whether the angle between the two planes is perpendicular (90°) or not. Then, repeat the process to check for a third plane of cleavage and its angle.
Exercise 1.5 – Mineral Cleavage
Your instructor has provided you with a selection of minerals.
- Determine the number of cleavage planes and angles between them for each of the listed minerals in Table 1.5.
Table 1.5 – Mineral Cleavage Sample # # Planes of Cleavage If >1 plane: Cleavage Angle (90° or ≠90°) 5 6 17 21 27 28 - Do all minerals have cleavage? Why or why not?
- Since cleavage can be used to distinguish between two minerals, give the sample numbers of two minerals that look similar but have different cleavages. What are the similar properties for these two minerals?
- Does a lack of cleavage help you distinguish between two similar-looking minerals? If so, which minerals are these?
- Sometimes, instead of using cleavage planes, you can distinguish a mineral by the pattern developed when a mineral is broken. Do any of the samples that lack cleavage have a distinctive fracture pattern? Describe it.
Form and Habit
Crystal habit describes the shape of a single crystal or the form of an aggregate of intergrown crystals. Crystal form describes single, well-formed crystals based on their geometric shape. The form of aggregates uses many different terms, most are likely unfamiliar to you (Table 1.6).
| Form | Description |
|---|---|
| Granular | An aggregation of grains, which usually lack distinctive crystal shapes |
| Massive | a uniform mass in which individual crystals cannot be distinguished |
| Columnar | blocky columns |
| Fibrous | a grouping of fibres |
| Micaceous | a flaky or sheet-like grouping |
| Oolitic | An aggregation of small spheres of a mineral |
| Botryoidal | resembles a bunch of grapes in form |
| Tabular or platy | thin plates, but not so thin as to be sheet-like |
| Druse | small, well-formed crystals covering the surface of a cavity |
| Rosette | tabular plates grouped in a form that resembles the shape of a flower |
Exercise 1.6 – Crystal Form and Habit
Your instructor has provided you with a selection of minerals.
- Sample #8 is a fully formed single crystal (in most drawers). What is its external crystal form?
- Sample #26 is a fully formed single crystal (in most drawers). What is its external crystal form?
- The following samples listed in Table 1.7 are crystalline aggregates. What is their form or habit for each sample?
Table 1.7 – Form and Habit Sample # Form or Habit 4 9 11 13 14 16 23 25 27 28
Other Properties
Minerals can also have other diagnostic properties. For many minerals, these are unique and an easy way to identify the mineral. Properties that might be useful include:
- Magnetism – Some minerals may be magnetic and are attracted to magnets. This property can help identify certain minerals, such as magnetite. Hematite is also weakly magnetic. To test for magnetism, you should hold the magnet so that it is freely swinging and bring it closer to the specimen to see if the magnet deflects toward the specimen.
- Play of colours (or pleochroism): The interference of light with layers of different composition. When minerals are rotated in the light, at least one cleavage surface may change colours, typically in a blue or violet “peacock” colour.
- Striations: Fine, thin, parallel grooves on cleavage surfaces or crystal faces, which are not the same as cleavage. Striations affect only the planar surface. Look for striations using a hand lens, turning the sample under a light as you inspect.
- Effervescence – Fizzing when certain minerals react with acids. For example, calcite and dolomite are two minerals that are soluble in weak hydrochloric acid. Calcite will effervesce on contact, whereas dolomite will only fizz in its powdered form. Geologists use acid that is about the same strength as vinegar for mineral testing. Your TA may show you this test in the lab, but you will not test for it yourselves in this course.
- Taste, Touch, and Odour – Some minerals have distinct tastes (ex., Halite tastes salty), feel (ex., Talc feels greasy or soapy), or odours (ex., Sulphur smells like rotten eggs) that can aid in mineral identification.
- Tenacity: Bendable or not, including flexible, elastic, brittle, malleable, and ductile.
- Double refraction: Lay a calcite crystal on printed text and look through; you may see a “double image”. It is caused by light splitting into two rays with different velocities and directions of propagation
- Density – Density is the mass per unit volume of a mineral. Different minerals have different densities due to varying chemical compositions. You can get a general understanding of a mineral’s density by feeling the weight of the mineral in your hand. A dense mineral may feel particularly heavy. For example, galena has a high density.
- Other physical properties include transparency (opaque, transparent, translucent), tarnish, fluorescence, twinning, among others. These properties are less commonly used but may be diagnostic for specific minerals
Exercise 1.7 – Other Mineral Properties
Your instructor has provided you with a selection of minerals.
- Determine which of your minerals exhibits any other properties and record them in Table 1.8.
Table 1.8 – Other Mineral Properties Property Mineral Sample Numbers - Which is your favourite unique property from this list? Why?
Additional Information
Exercise Contributions
Lab 1: What Are Minerals? was modified by Jessica Kristof and Ricardo L. Silva from the original Chapter 4: Minerals by Virginia Sisson and Daniel Hauptvogel in Hauptvogel et al. (2024) and the original Lab 1: Minerals from Ferreira and Young (2018).
References
Hauptvogel, D., Sisson, V., and Comas, M. (2024). Investigating the Earth: Exercises for Physical Geology. Houston, TX: UH Libraries
Ferreira, K., Young, J. (2018). GEOL 1340 The Dynamic Earth Lab Manual. Winnipeg, MB: Department of Geological Sciences, University of Manitoba
a naturally occurring, inorganic, solid that can be defined by a chemical formula and a crystal structure.
property of an object that is the result of how the object reflects light
physical property that describes how the surface of a mineral reflects light
the process of being worn by exposure to the atmosphere
the colour of a mineral's powder
physical property of minerals that describes a mineral's resistance to scratching
the qualitative ranking of minerals based on the "hardness" (or resistance to scratching)
cleavage is a type of foliation that forms within fine grained rocks due to deformation and metamorphism
the unpredictable breakage of a mineral
planes of weak chemical bonds that minerals predictably break along
curved fracturing that resembles broken glass
the shape that a mineral grows into

_and_quartz_(gray)_grains.jpg#file)